


How to build a complete email automation machine using Zapier
Becoming a better salesperson


Automating email sequences has become an essential part of a sales rep's process. The sheer volume of contacts to reach out to and the number of touchpoints they must have with each consumes the day of most reps. As we always preach here at noCRM.io, the time we have in the day is time we need to use being productive and move the needle in every deal we work on.
That means the less time we spend on repetitive tasks, the more time we have to work on deal progression.
A lot of small or bootstrapped companies simply don't have the budget to add an email automation app to their existing stack. It goes without saying that such apps don't just automate emails, but their complete features may not be what you need just yet.
noCRM.io is a lead management software that accompanies sales reps through every step of their sales process; from the moment a prospect is created until it converts into a customer.
Instead, you can create an email automation machine directly inside noCRM.io without any coding necessary.
Get started:
- The scenario
- The setup
- Create your Trigger: Lead turning into a "To do" in a pipeline of your choice
- Create a filter: Only the leads in the specified pipeline go through this process
- Create the Paths: Send templated emails to leads in each step until they reach the final step
- Create a Zap to stop automated emails when leads respond
The scenario
Your process and set-up are as follows:
- You have two pipelines: the first, named Prospecting, is to engage with new leads as they come in and get them to answer you. The second is to start your real sales process.
- You have also prepared 3 email templates to use in the first pipeline.
Once a lead has entered your Prospecting pipeline, you'd like the sales rep in charge of the lead to quickly send out the first template email. Following that, the lead should be moved to the next step and set on Standby for the second template email to be sent in x amount of days.
On the day of the follow-up, assuming the lead hasn't responded yet, your rep should send their second template email and move them down the pipeline. After that, it's rinse-and-repeat until the lead either responds or reaches the last step in your pipeline.
It makes sense to automate the above activities to free up your sales rep to focus on pivotal actions, doesn't it? So, let's automate your prospecting process!
The setup
For this tutorial, we'll be using the Zapier combined with noCRM's Simplified API.You need just a few things to get yourself started:
- ✅noCRM account with the Dream edition (If you don't have one yet, start your free trial here)
- ✅Zapier account (If you don't have one yet, start your free trial here)
- ✅A pipeline specifically for your prospecting process
- ✅Ready-to-use email templates
⚠️Email templates should follow this naming structure Pipeline Name_Step Name.
Example: if your pipeline is called "Prospecting" and your first step is called "1st Touchpoint", then the first email template you want to send should be named "Prospecting_1st Touchpoint" and so on.
The automation requires two zaps:
The first is to send an email to a lead when it turns to a "To do", move the lead to the next step, and then set it on "Standby". The process repeats until the lead reaches the last step of the pipeline. The second Zap is to stop the process if the lead answers the email.
Let's start with the first zap!

Create your Trigger: Lead turning into a "To do" in a pipeline of your choice
Head on over to your Zapier account and click on "Create Zap"
Choose the Event "Webhooks by Zapier" and the Event Trigger "Catch Hook". This generates a URL that you need to copy and paste into your noCRM account.
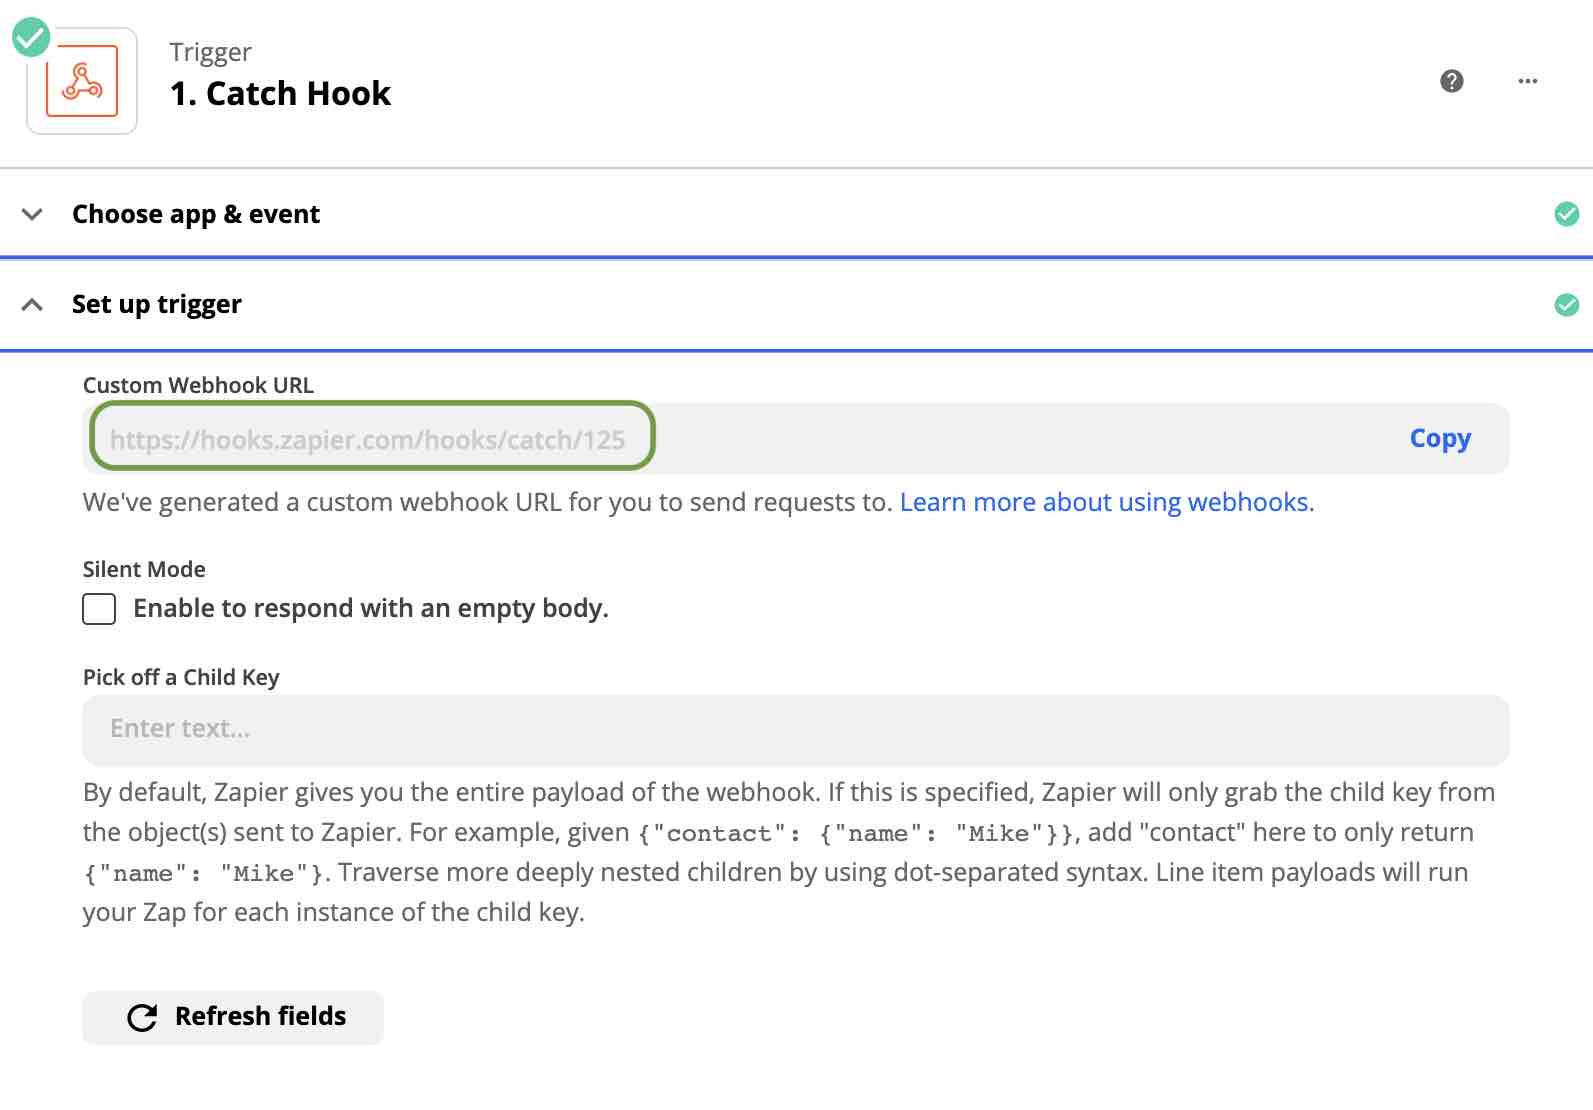
Next, go into your noCRM's Admin Panel > Integrations > API > Webhooks. Create a new webhook, name it, choose the Event as "lead.status.changed.to", and select the Status "To do". Enter the copied Custom Webhook URL into the URL field.
⚠️Choose the API key that you created to connect your noCRM account to Zapier. If you haven't connected your noCRM to Zapier yet, follow the steps found here.
This serves to notify Zapier every time a lead turns into a "To do".

⚠️ Make sure you create a sample lead and put it on the status To do in order to correctly test this Trigger
Create a filter: Only the leads in the specified pipeline go through this process
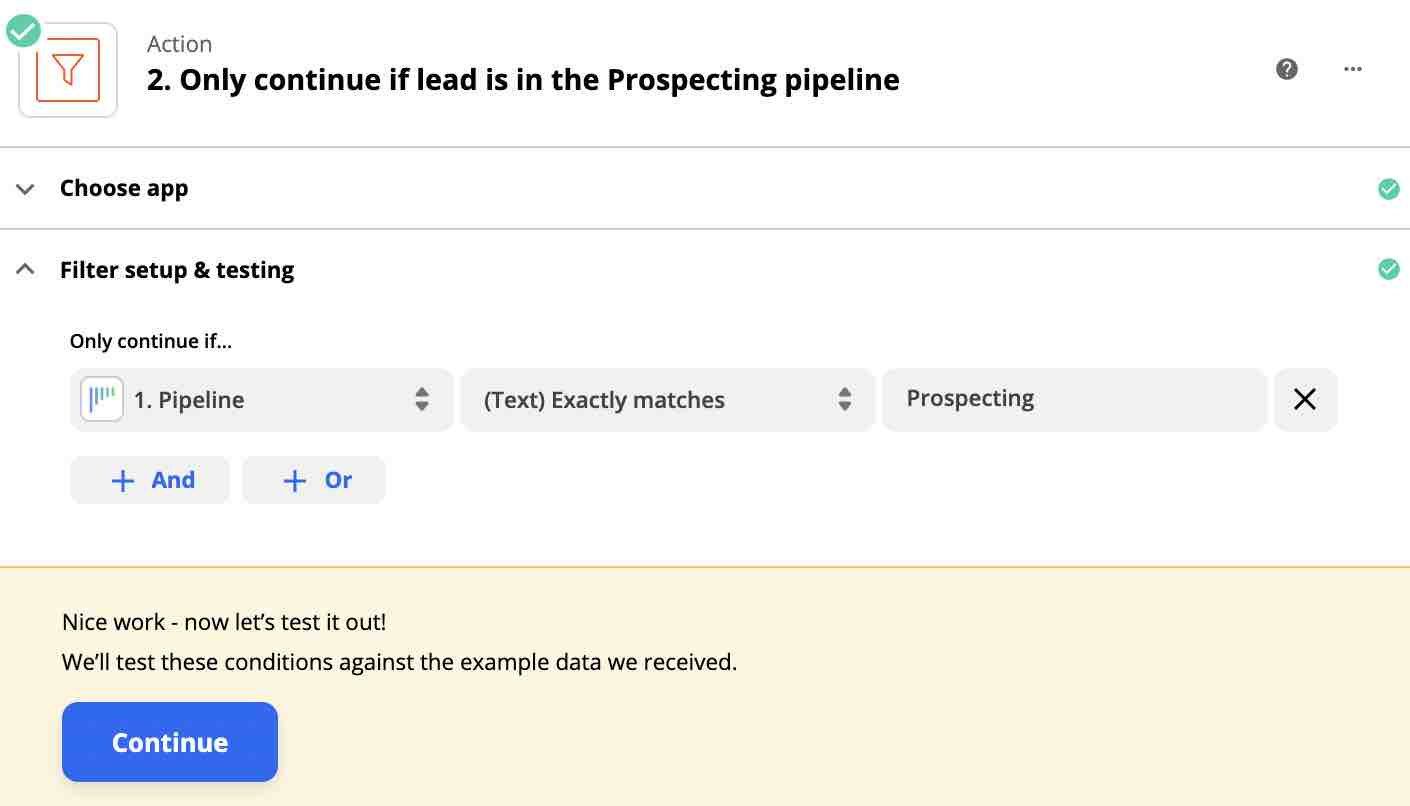
We don't want Zapier to run every time any lead turns into a "To do". You want to set this up only for the leads in the Prospecting pipeline. To do that, we need to set up a filter Action.
Select the app "Filter by Zapier" and set it up as follows:
In the "Only continue if" field, choose "Webhook Event Data Pipeline", then enter in the "(Text) Exactly matches" field the name of your pipeline "Prospecting".

Create the Paths: Send templated emails to leads in each step until they reach the final step
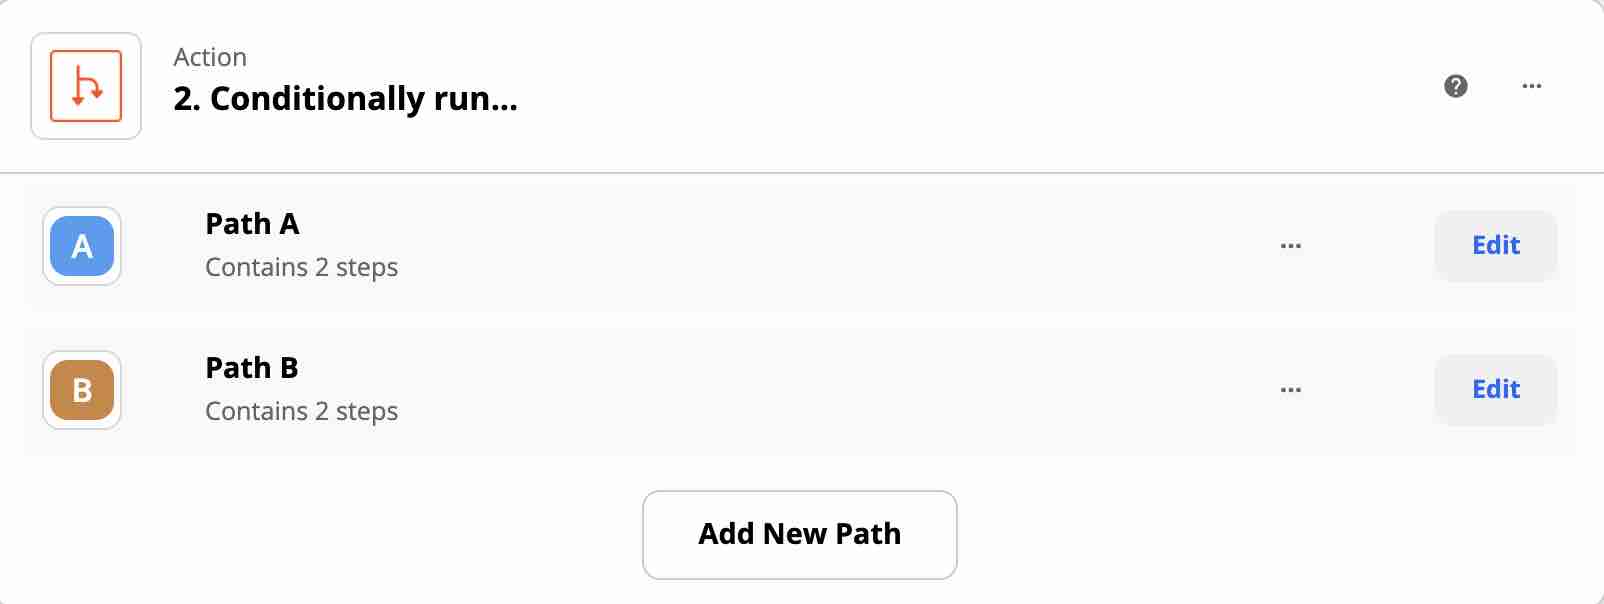
Now we're going to introduce Paths to this workflow. This means we can set up two different paths this Zap can take depending on which condition it fulfills. In our example, we want Zapier to:
- Path A: Send the template email corresponding to the step the lead is in each time it turns into a "To do". Then, move it to the next step in the pipeline and put it on Standby. This continues in each step until it reaches the end of the pipeline.
- Path B: When the lead enters the last step in the pipeline, turn the lead status to "Cancelled".
Let's translate that into steps in Zapier. Create a third Action and choose the app "Path by Zapier".
Create your Path A: Send template email, move leads to the next step, and set them on Standby.
- Set up path rule
Edit Path A: Name it "Send email per step" (or anything else you'd like).
In the "Only continue if" field, choose "Webhook Event Data Step" from the Catch Hook step. Then enter the name of the last step in your pipeline in the "(Text) Does not exactly match" field. In this example, the last step is named "Final Stage".

- Set up email template IDs finder
Next up, create an Action with the app "Formatter by Zapier".
This step will allow us to automate which email template Zapier should send depending on which step the lead is in.
Select the Action Event "Utilities" then choose "Lookup Table" in the resulting "Transform" field.
Reminder: At the beginning of this article, we require that you name your templates in the following format: Name of Pipeline_Name of Step.
So, in the "Lookup Key" field, put the name of your pipeline, "Prospecting" in this case, underscore "_", then add the pipeline step retrieved from the Trigger Event.

In the "Lookup Table", add the names of all the templates you want to send to your leads in each step of your Prospecting pipeline.
In this example, we have three emails: the first to be sent in the "1st Touchpoint" step, the second in the "2nd Touchpoint" step, and the third to be sent in the "3rd Touchpoint" step.
Lastly, enter the template ID next to each of the corresponding template names.
Find your email template ID in the Admin Panel > Integrations > API > Account Object IDs

- Send step-specific email template
Reminder: 2-way emailing only works in the Dream edition.
Create a second Action in this Path. Choose the Event App noCRM.io and the Action Event "Call Simplified API".
Set up the lead to be retrieved from the first step "Webhook Event Data ID" in the Custom tab.

Choose the Simplified API Path as "Send lead a template email" and the email template identifier from the last step "Send email per step - 2. Find email template ID" named "Webhook Event Data Step".

As for the "FROM user identifier to send the email" field, if you want all the emails to be sent from one specific user, add that user's email address or user ID. If you'd like the email to be sent from the user to who the lead is assigned, then select the User ID from the "1. Catch Hook" step.

- Move lead to the next step
Let's set up our third Action in this Path. Select the noCRM.io Event App and the "Call Simplified API" as the Action Event again. Choose the lead from the custom tab under the "Catch Hook" step.
As for the Simplified API Path, select "Move lead to the next step in the pipeline".

- Set lead on Standby for three days then repeat
The last Action in Path A is setting your lead to Standby for your next follow-up email.
Repeat the steps above to create the final Action and set up the lead.
Next, choose "Change lead status to Standby" as the Simplified API Path and enter the number of days in the future you'd like to set up the follow-up— in this case, it's three.
Lastly, you may choose to attach an activity to it. As it's an email follow-up, we're going to use the email activity ID found in the Account Object IDs page in your account.
Reminder: All object IDs are unique to your account so do not copy and paste the IDs you see in this article.

With that, Path A a.k.a "Send email per step" is ready!
Create your Path B: Cancel leads reaching the last step in the pipeline
This path serves to change the status of leads that reach the last step in your pipeline to "Cancelled" and remove them from the email automation workflow.
You can rename this step from Path B to "Cancel leads in the last step" for the sake of clarity.
In the "Only continue if" field, choose "Webhook Event Data Step" from the Catch Hook step. Then enter the name of the last step in your pipeline in the "(Text) exactly matches" field. In this example, the last step is named "Final Stage".

Finally, create an Action with noCRM.io as the Event App and "Call Simplified API" as the Action Event.
Next, set up your lead as we've done throughout this article and select "Change the lead's status to Cancelled" as the Simplified API Path.

We're done! Now every time a lead turns into a "To do", an email template matching the step the lead is in will automatically be sent out. The lead will then be automatically moved to the next step and set on Standby for an email follow-up in 3 days. Once the lead enters the last step, it will automatically be set to "Cancelled" and no emails will be sent out.
Create a Zap to stop automated emails when leads respond
If the lead answers you before reaching the last step in your pipeline, you want to make sure they don't receive any more of the templated emails. In this example scenario, you want to also move the lead to the second pipeline for your sales rep to manually manage it. For that, we need to create a separate Zap that looks like this:

Create a Zap and select noCRM.io as the Event App and "New Email Received from a lead" as the Action Event. Connect the same noCRM account you used in the email automation Zap.
Reminder: The trigger "New Email Received from a Lead" is only available in the Dream edition as it's part of the 2-way emailing feature.
We will now introduce the filter Action to make sure only leads in the Prospecting pipeline trigger this Zap.
Select the app "Filter by Zapier" and set it up as follows:
In the "Only continue if" field, choose "Pipeline", then enter in the "(Text) Exactly matches" field the name of your pipeline "Prospecting".
The next Action is moving your lead to the first step of the second pipeline. We're naming ours "Sales". Set up your action with the Simplified API Path as "Move lead to a different pipeline" and go to the custom tab to set up the lead. Then enter the step ID you want to move the lead to which is found in the Account Object IDs page in your noCRM account.

Lastly, create your final Action* with the noCRM.io app and select "Call Simplified API" as the Action Event. As we've done above, set up the lead and choose "Change lead status to To do".
Your email automation machine is now successfully set up! You may adjust this to match your exact process. Your sales reps can finally focus on qualified leads and use their time efficiently to manage and close deals.
Head to our Integrations Marketplace and see what other apps you can connect noCRM with using no-code.