Easily create and use quotes and invoices within noCRM
This article answers the following questions:
With noCRM’s quotes and invoices feature, you can streamline your billing process and maintain clear records of client interactions. This article will walk you through creating quotes, converting them to invoices, and using various invoice types to match your business needs.
Setting up quotes and invoices
Before starting to create quotes and invoices within noCRM, it's essential for an account administrator to configure this feature from the admin panel to align with your company's requirements and brand image.
Understanding Invoice Types
noCRM offers different invoice types to support various billing scenarios:
- Standard Invoice: A regular invoice for completed services or products.
- Deposit Invoice: Request an upfront payment before project completion. You can specify the deposit as a fixed amount or percentage of the total.
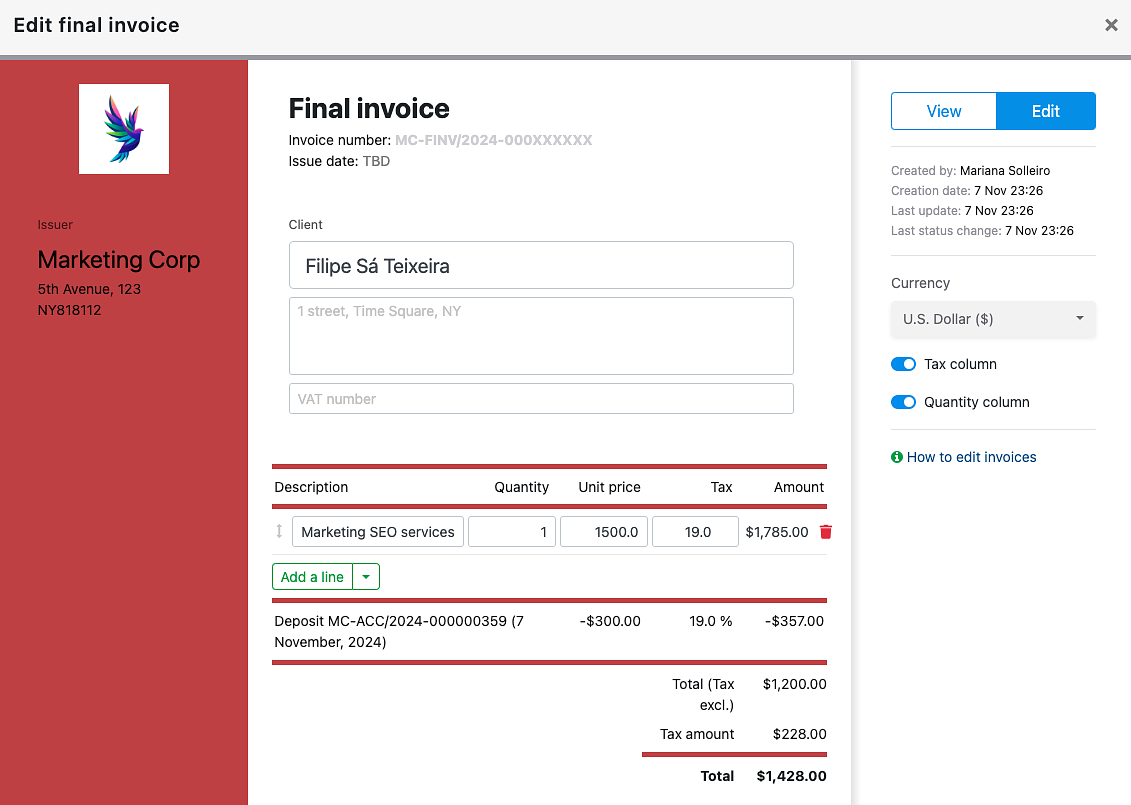
- Final Invoice: A comprehensive summary of all payments made, including deposits. It shows the total minus previously invoiced deposits.
- Credit Note: Used to adjust an issued invoice for reasons such as cancellations, returns, or billing corrections. Credit notes appear as negative amounts.
Best Practice: Choose the appropriate invoice type based on your client’s billing arrangement. Deposit and final invoices are ideal for projects with multiple payment stages, while credit notes help maintain accurate records for adjustments.
Creating and Managing Quotes
A quote outlines the estimated costs for your products or services, giving clients a clear view of expected expenses. Here’s how to create a quote:
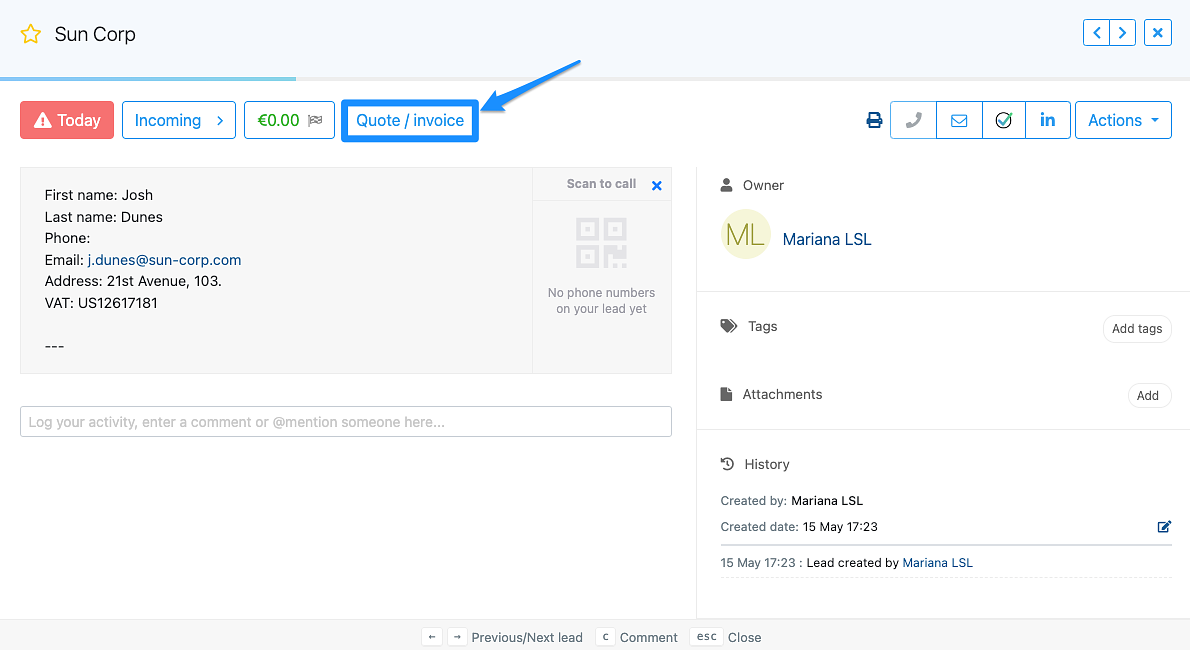
- 1. Go to the relevant lead: Navigate to the lead for whom you want to create a quote.
- 2. Select "Quote" from the top of the lead's card.
- 3. Enter the Details:
- Item description: Provide a clear description of each item or service.
- Quantity and Unit Price: Enter quantities and prices for accurate calculations.
- Discount (Optional): Enter a percentage and obtain the discounted price.
- Tax (Optional): Select a tax percentage if applicable.

- 4. Review and save: Preview your quote and, once satisfied, click "View" to finalize it.
Creating and Managing Invoices
Creating an Invoice from a Quote
Once a lead accepts a quote, you can easily create an invoice through the quote. Here’s how:
- 1. Open the 'Accepted' Quote.
- 2. Click "Actions > Create invoice": This action will automatically transfer details from the quote to a new invoice.
- 3. Verify invoice details: Ensure all details, including amounts, taxes, and payment terms, are correct.
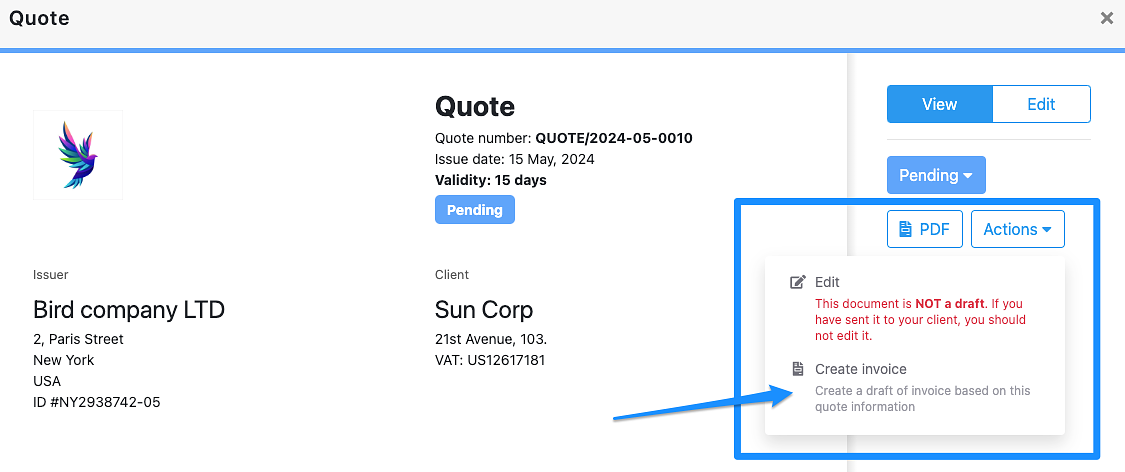
- 4. Save and finalize: Save the invoice by changing its status to "Pending payment", and send it to your customer.
Tip: Double-check billing details before converting to an invoice, as this becomes the official billing document for the client.
Creating a Deposit Invoice (from an existing quote)
A deposit invoice requests an upfront payment from the client, commonly used for projects that require initial funds before starting or reaching completion. Here’s how to create a deposit invoice:
- 1. Go to the relevant lead: Navigate to the lead for whom you want to request a deposit.
- 2. Select the approved quote at the right of the lead card
- 3. Open the quote > Click on "Actions" > Create a Deposit Invoice.
- 4. Enter deposit details:
- Amount or Percentage: You can specify the deposit as a fixed amount or as a percentage of the total project cost.
- Description: Provide a clear description of what the deposit covers, helping the client understand the purpose.
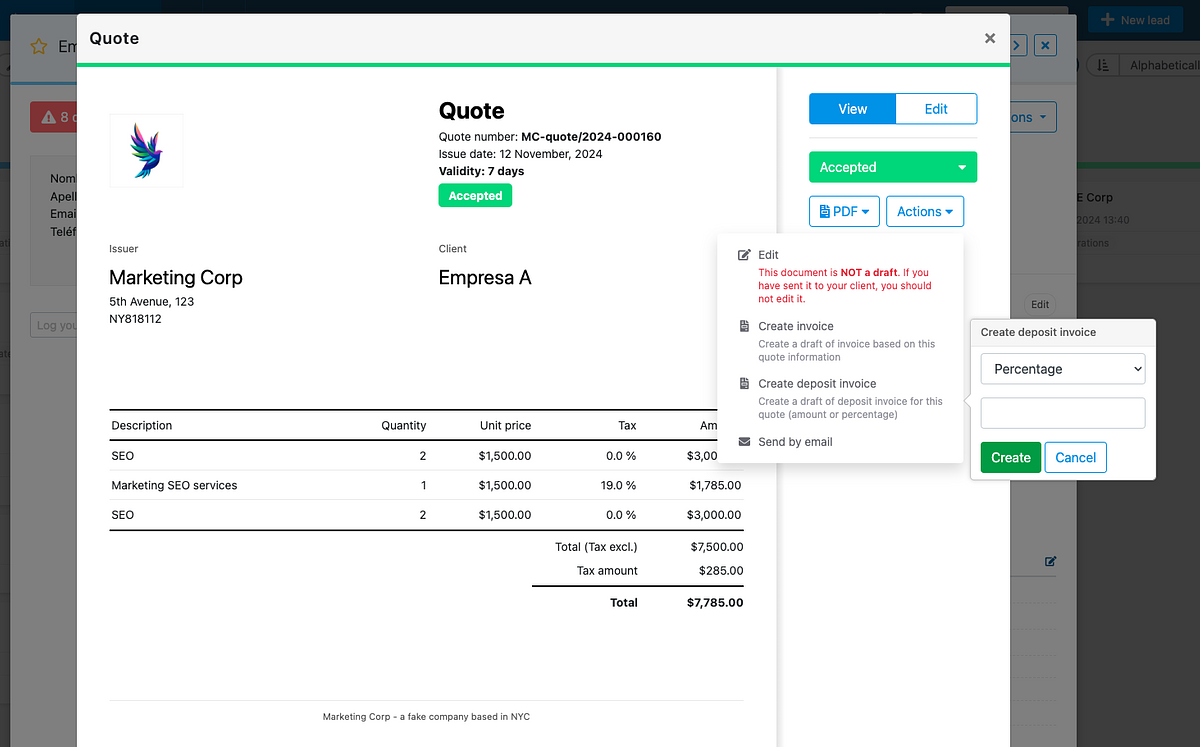
Once created, you can manage the deposit invoice just like any other invoice, updating its status as payments are received. The deposit will automatically be accounted for in the final invoice, ensuring transparency and accuracy in the billing process.
Tip: Use deposit invoices to secure initial funding and establish a clear payment plan with your client.
You can create several deposit invoices, always from the initial quote.
Issuing the Final Invoice
Once all services are complete and any necessary deposits have been received, you’re ready to issue the final invoice. The final invoice will automatically account for any previous deposits, giving the customer a clear picture of the total amount due.
Steps to Issue the Final Invoice:
- Open the relevant lead: from the invoice where the project was originally managed, select "Create Final Invoice."
- Review deposit deductions: The system will automatically apply any deposit invoices already issued, showing them as line items on the final invoice. This ensures that the final amount accurately reflects previous payments.
- Adjustments (if needed): Review any additional charges or final adjustments before saving.
- Save and Send: Once reviewed, select "Payment Pending" to make the final invoice official. You can then send it directly to your client for payment.
Note: The final invoice will show the total contract amount, list any deposit payments received, and display the remaining balance due. This transparency ensures clients have a clear record of all transactions related to the project.
Using Credit Notes for Adjustments
Credit notes allow you to make adjustments to invoices for partial refunds, returns, or other corrections.
- 1. Open the relevant invoice: Navigate to the invoice you need to adjust.
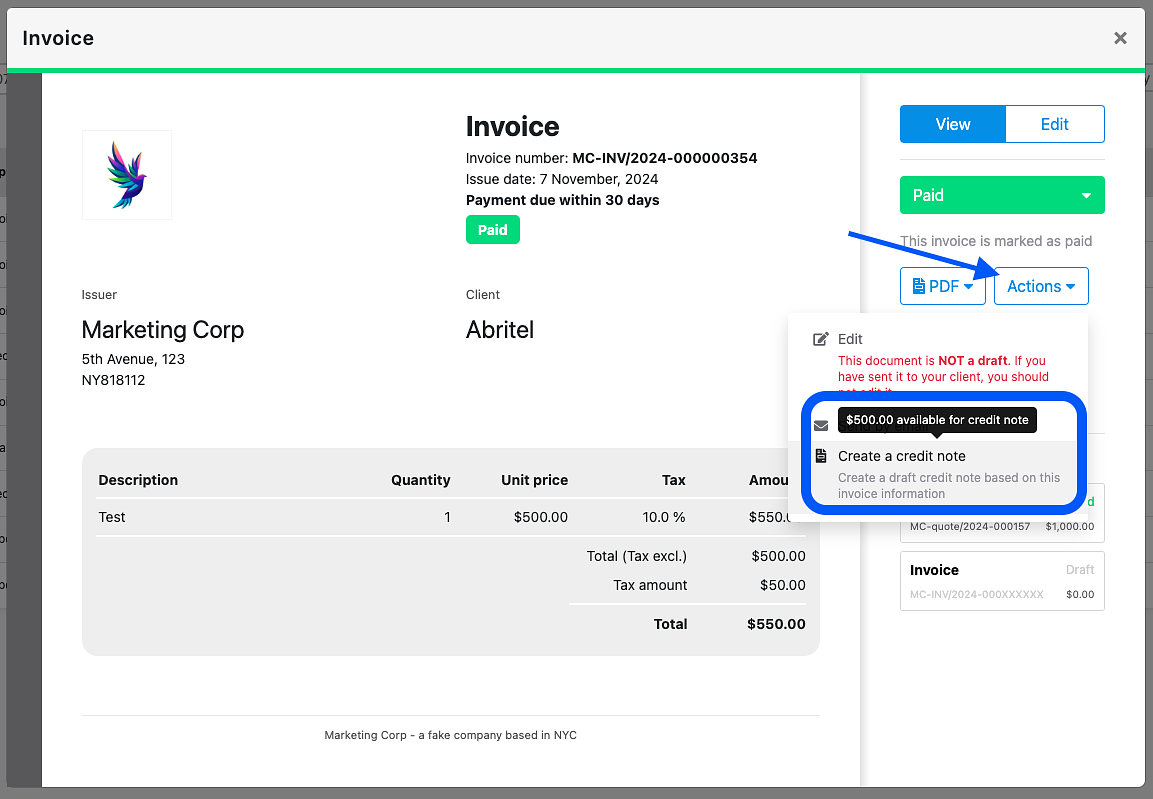
- 2. Click "Create Credit Note": Specify the amount to be credited and confirm.
- 3. View the Credit Note to save it: This will apply the credit note to the invoice, updating the balance.
Tip: Issue credit notes only when necessary to keep accounting records clear and accurate.
Sending Quotes & Invoices to Clients
Once a quote or invoice is ready to be sent to your lead, you'll have two options:
- 1. Download it as a PDF and send it attached to an email.
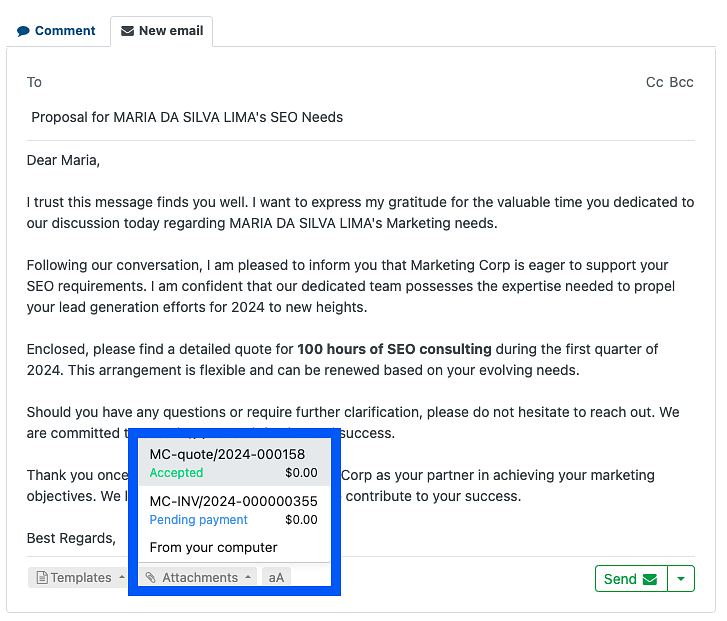
- 2. Write an email from the 'Email' tab inside the lead, click on "attachments," and choose the quote/invoice you wish to share as a link.
Managing Invoice Statuses
Invoice statuses help you track payment progress and update lead statuses. Don't worry, your lead does not see the status!
Here’s how statuses work:
- Draft: The invoice is still being prepared and can be edited.
- Pending payment: Once finalized, set the invoice to pending payment to mark it as officially sent.
- Paid: Mark the invoice as paid once the client completes payment.
- Unpaid: If the client fails to pay within the set deadline, mark the invoice as unpaid.
Best Practice: Regularly update invoice statuses to maintain accurate records and use noCRM’s automations to change lead statuses based on invoice statuses (e.g., setting a lead to "Won" when an invoice is marked as paid).
Setting Payment Deadlines and Terms
Clear payment deadlines and terms help set client expectations and streamline your billing process.
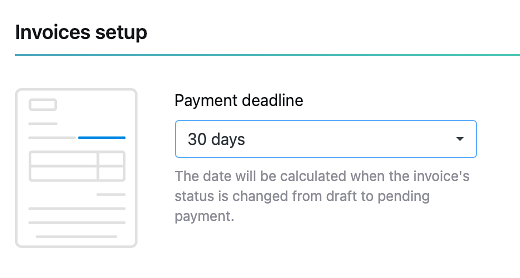
- Default Payment Deadlines: In the Admin Panel under Invoices Terms, set a default payment deadline (e.g., 10 days).
- Custom Terms: You can enter custom terms for individual invoices, such as specific payment instructions or late fees.
Best Practice: Define clear and concise payment terms on each invoice to minimize misunderstandings and improve payment timelines.
