Personalized in-app widgets
This article answers the following questions:
noCRM.io offers built-in personalized widgets to allow businesses to create a simple and seamless integration between their internal system and their noCRM account. More specifically, it enables them to display external information directly in noCRM.
1. The dashboard widget
It can be activated and defined in the Admin panel > Account management > User interface > Dashboard widgets section of your account. The Widget can be either HTML or IFRAME.
In the HTML mode, you can add any HTML content including javascript and IFRAMEs. You have access to some variables like the email address of the connected user, their name, and their ID. This can be very useful to display a link to sales documents or forms pointing to your internal information system.
The IFRAME mode allows you to point to an external resource on the web and can help you include some resources from your website directly in our app. The only constraint you have is that the URL of the IFRAME must be served under the secure HTTPS protocol. You can use any exposed variable in the URL of your IFRAME.
2. The lead widget
It can be activated in Admin panel > Integration > Built-in tools > Lead widget. The lead widget is displayed on the detailed view of each lead. Its purpose is to expose some of the lead's attributes, allowing you to retrieve and display information that is specific to this lead either from your own information system or from third-party services like social media platforms or Google Maps.
Let's suppose that you have in your own information system some specific information about a prospect, such as the fact that they interacted with your support team, or that have previously bought a product or how often did they come to your website or any other relevant data you could have; with this widget you will be able to display this information directly on the lead's detail page.
For more information on how to display information from another service you use inside your noCRM leads, please read this page.
You can only have one active lead widget but as you can edit its HTML, it can be multipurpose. Below we explain how to use the Lead Widget to embed Google Maps.
Geolocate Your Leads: Embed Google Maps in noCRM.io
As a sales person, you often need to meet with your existing & potential customers in person. You have a lead management software with all their information, including the address, but you want it to be displayed in Google Maps. Wouldn't it be great if you could immediately visualize your leads' location without having to type in their address on Google Maps manually? Automating such tasks in your sales process can make your sales team win precious minutes.
Well, great news! Inside noCRM it’s possible to embed external information in your lead pages, such as social media data services, your own information system, but also Google Maps!
Create an API key to be able to use Google Maps
First of all you need to request an API key from Google. To do so, you need to have a Google account and log in at: https://console.developers.google.com/
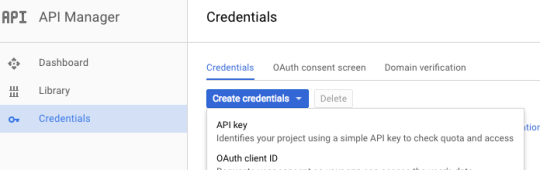
Second of all, on the left menu, go to “credentials” and create a new project that you could call “Geoloc”.
Third of all, select “create an API key”, copy the key somewhere on your computer, you will need it later.
Once you’ve done all the steps mentioned above, you must activate 3 different APIs:
- Google Maps Geocoding API
- Google Maps JavaScript API
- Google Maps Embed API
It is very easy to do it: on the left menu click on API, and find the 3 APIs in the Google Maps block, then for each API click on “ENABLE”.

There is one more step before you're done on the Google side: you need to enable the billing on your Google Cloud account. To do so, go to the page: https://console.cloud.google.com/project/_/billing/enable. You will be asked to fill in your billing information. This does not mean that you will be charged because Google Maps API offers $200 per month of credit which should be enough to use the Google Maps integration with noCRM. It doesn't exclude that after a certain amount of usage, you may be charged though. Here is the pricing page for Google Maps: https://cloud.google.com/maps-platform/pricing. Please find more information here: https://developers.google.com/maps/gmp-get-started.
Perfect! You’re now done on the Google side.
Now, go to your noCRM account.
Embedding the Google Maps with the lead widget.
First of all, be sure to have defined at least one address field for your leads. This can be done in the Admin > Default fields section. Let’s suppose you have named the field: address.
Second of all, go to the connection section of the Admin and click on the “Lead Widget”.
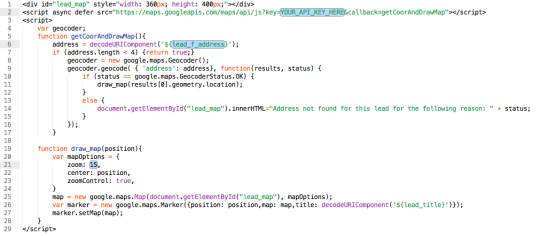
- Set the lead widget height to 400 pixels
- Choose the HTML mode
- Download and Copy / paste the following code and ensure you have copy/pasted your personal API key and used the correct address variable name (here leadfaddress). Variable names are listed on the lead widget page so it is easy to check. You can also change the default Zoom factor depending on the level of zoom you want.
All done! If you go to a lead which has an address correctly defined, a map will be displayed.